Saturday, December 5, 2015

RAID 0, RAID 1, RAID 5, RAID 10 Explained with Diagrams


RAID 0, RAID 1, RAID 5, RAID 10 Explained with Diagrams

RAID stands for Redundant Array of Inexpensive (Independent) Disks.
On most situations you will be using one of the following four levels of RAIDs.
  • RAID 0
  • RAID 1
  • RAID 5
  • RAID 10 (also known as RAID 1+0)
This article explains the main difference between these raid levels along with an easy to understand diagram.

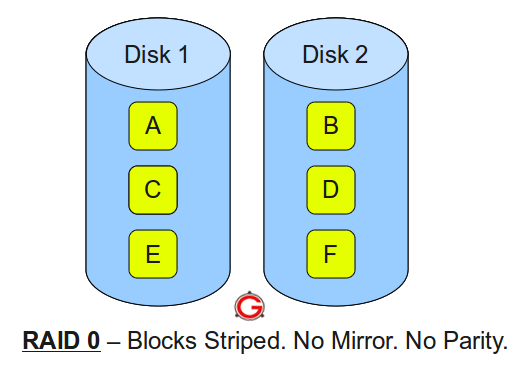
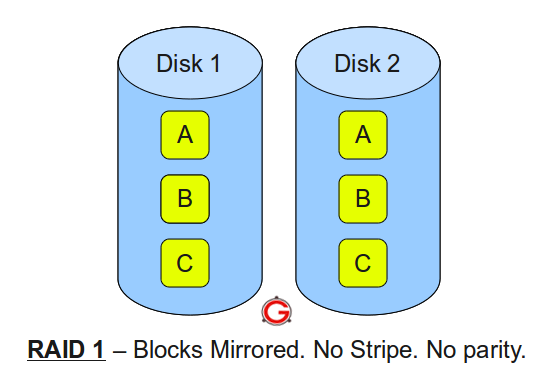
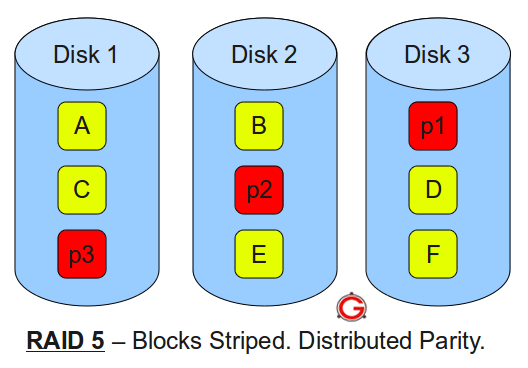
In all the diagrams mentioned below:
  • A, B, C, D, E and F – represents blocks
  • p1, p2, and p3 – represents parity

RAID LEVEL 0


Following are the key points to remember for RAID level 0.
  • Minimum 2 disks.
  • Excellent performance ( as blocks are striped ).
  • No redundancy ( no mirror, no parity ).
  • Don’t use this for any critical system.

RAID LEVEL 1

Following are the key points to remember for RAID level 1.
  • Minimum 2 disks.
  • Good performance ( no striping. no parity ).
  • Excellent redundancy ( as blocks are mirrored ).

RAID LEVEL 5


Following are the key points to remember for RAID level 5.
  • Minimum 3 disks.
  • Good performance ( as blocks are striped ).
  • Good redundancy ( distributed parity ).
  • Best cost effective option providing both performance and redundancy. Use this for DB that is heavily read oriented. Write operations will be slow.

RAID LEVEL 10

Following are the key points to remember for RAID level 10.
  • Minimum 4 disks.
  • This is also called as “stripe of mirrors”
  • Excellent redundancy ( as blocks are mirrored )
  • Excellent performance ( as blocks are striped )
  • If you can afford the dollar, this is the BEST option for any mission critical applications (especially databases).

Striping, Mirroring & Parity


Striping, Mirroring & Parity

1. Striping :
For me, Striping is the most confusing RAID level as a beginner and needs a good understanding and explanation. We all know that, RAID is collection of multiple disk’s and in these disk predefined number of contiguously addressable disk blocks are defined which are called as strips and collection of such strips in aligned in multiple disk is called stripe.

RAID Striping

Suppose you have hard disk, which is a collection of multiple addressable block and these blocks are stacked together and called strip and you have multiple such hard disk, which are place parallel or serially. Then such combination of disk is called stripe.
 Note: Without mirroring and parity, Striped RAID cannot protect data but striping may significantly improve I/O performance.


> Disk striping is the process of dividing a body of data into blocks and spreading the data blocks across multiple storage devices, such as hard disks or solid-state drives (SSDs). A stripe consists of the data divided across the set of hard disks or SSDs, and a striped unit, or strip, that refers to the data slice on an individual drive.
2. Mirroring :Mirroring is very simple to understand and one of the most reliable way of data protection. In this technique, you just make a mirror copy of disk which you want to protect and in this way you have two copies of data. In the time of failure, the controller use second disk to serve the data, thus making data availability continuous.
RAID Mirroring

When the failed disk is replaced with a new disk, the controller copies the data from the surviving disk of the mirrored pair. Data is simultaneously recorded on both the disk. Though this type of RAID gives you highest availability of data but it is costly as it requires double amount of disk space and thus increasing the cost.

3. Parity :
As explained above, mirroring involves high cost, so to protect the data new technique is used with striping called parity. This is reliable and low cost solution for data protection. In this method and additional HDD or disk is added to the stripe width to hold parity bit.
Parity is a redundancy check that ensures full protection of data without maintaining a full set of duplicate data.

RAID Parity

The parity bits are used to re-create the data at the time of failure. Parity information can be stored on separate, dedicated HDDs or distributed across all the drives in a RAID set. In the above image, parity is stored on a separate disk.
The first three disks, labeled D, contain the data. The fourth disk, labeled P, stores the parity information, which in this case is the sum of the elements in each row. Now, if one of the Disks (D) fails, the missing value can be calculated by subtracting the sum of the rest of the elements from the parity value.
Hope you have understood the basic of these RAID level. If you have any issue or concern, please let us know through your mails and comment.

Tuesday, October 20, 2015

Shell script to watch the disk space


source

Shell script to watch the disk space

df displays the amount of disk space available on the file system containing each file name argument. If no file name is given, the space available on all currently mounted file systems is shown. Read man page of df if you are new to df command.

Steps

=> Find disk space using df
=> Filter out filesystem and find out the percentage of space using grep
=> Write a shell script

Step # 1: First get disk space:

$ df -H
Output:
Filesystem             Size   Used  Avail Use% Mounted on
/dev/hdb1               20G    14G   5.5G  71% /
tmpfs                  394M   4.1k   394M   1% /dev/shm
/dev/hdb5               29G    27G   654M  98% /nas/www

Step # 2: Next filter out filesystem and find out the percentage of space

$ df -H | grep -vE '^Filesystem|tmpfs|cdrom' | awk '{ print $5 " " $1 }'
Output:
71% /dev/hdb1
98% /dev/hdb5

Step # 3: Write a shell script

Above command displays field 5 and 1 of df command. Now all you need to do is write a script to see if the percentage of space is >= 90% (download script):
#!/bin/sh
df -H | grep -vE '^Filesystem|tmpfs|cdrom' | awk '{ print $5 " " $1 }' | while read output;
do
  echo $output
  usep=$(echo $output | awk '{ print $1}' | cut -d'%' -f1  )
  partition=$(echo $output | awk '{ print $2 }' )
  if [ $usep -ge 90 ]; then
    echo "Running out of space \"$partition ($usep%)\" on $(hostname) as on $(date)" |
     mail -s "Alert: Almost out of disk space $usep%" you@somewhere.com
  fi
done

Setup Cron job

Save and install script as cronjob. Copy script to /etc/cron.daily/ (script downolad link)
# cp diskAlert /etc/cron.daily/
# chmod +x /etc/cron.daily/diskAlert
OR install as cronjob:
crontab -e
Write cronjob as per your requirement
10 0 * * * /path/to/diskAlert

Updated script version

Tony contributed and updated my script - You can exclude selected filesystem in case you don't want monitor all filesystems.
#!/bin/sh
# set -x
# Shell script to monitor or watch the disk space
# It will send an email to $ADMIN, if the (free available) percentage of space is >= 90%.
# -------------------------------------------------------------------------
# Set admin email so that you can get email.
ADMIN="root"
# set alert level 90% is default
ALERT=90
# Exclude list of unwanted monitoring, if several partions then use "|" to separate the partitions.
# An example: EXCLUDE_LIST="/dev/hdd1|/dev/hdc5"
EXCLUDE_LIST="/auto/ripper"
#
#::::::::::::::::::::::::::::::::::::::::::::::::::::::::::::::::::::::::::::::::::::::::::::::::::::::::
#
function main_prog() {
while read output;
do
#echo $output
  usep=$(echo $output | awk '{ print $1}' | cut -d'%' -f1)
  partition=$(echo $output | awk '{print $2}')
  if [ $usep -ge $ALERT ] ; then
     echo "Running out of space \"$partition ($usep%)\" on server $(hostname), $(date)" | \
     mail -s "Alert: Almost out of disk space $usep%" $ADMIN
  fi
done
}
if [ "$EXCLUDE_LIST" != "" ] ; then
  df -H | grep -vE "^Filesystem|tmpfs|cdrom|${EXCLUDE_LIST}" | awk '{print $5 " " $6}' | main_prog
else
  df -H | grep -vE "^Filesystem|tmpfs|cdrom" | awk '{print $5 " " $6}' | main_prog
fi

Sunday, October 18, 2015

rpm command cheat sheet for Linux


source : http://www.cyberciti.biz/howto/question/linux/linux-rpm-cheat-sheet.php


Syntax
Description
Example(s)
rpm -ivh {rpm-file}
Install the package
rpm -ivh mozilla-mail-1.7.5-17.i586.rpm
rpm -ivh --test mozilla-mail-1.7.5-17.i586.rpm
rpm -Uvh {rpm-file}
Upgrade package
rpm -Uvh mozilla-mail-1.7.6-12.i586.rpm
rpm -Uvh --test mozilla-mail-1.7.6-12.i586.rpm
rpm -ev {package}
Erase/remove/ an installed package
rpm -ev mozilla-mail
rpm -ev --nodeps {package}
Erase/remove/ an installed package without checking for dependencies
rpm -ev --nodeps mozilla-mail
rpm -qa
Display list all installed packages
rpm -qa
rpm -qa | less
rpm -qi {package}
Display installed information along with package version and short description
rpm -qi mozilla-mail
rpm -qf {/path/to/file}
Find out what package a file belongs to i.e. find what package owns the file
rpm -qf /etc/passwd
rpm -qf /bin/bash
rpm -qc {pacakge-name}
Display list of configuration file(s) for a package
rpm -qc httpd
rpm -qcf {/path/to/file}
Display list of configuration files for a command
rpm -qcf /usr/X11R6/bin/xeyes
rpm -qa --last
Display list of all recently installed RPMs
rpm -qa --last
rpm -qa --last | less
rpm -qpR {.rpm-file}
rpm -qR {package}
Find out what dependencies a rpm file has
rpm -qpR mediawiki-1.4rc1-4.i586.rpm
rpm -qR bash

Monday, August 31, 2015

diffrence between zombie and orphan process


Zombie Process :
---------------------

If the child process is dead but its parent process is alive, the child process is declared zombie, means if you run ps aux, you will see that the just died child process is having a Z in the STAT column.

>> It does not use resources and it cannot be scheduled for execution. 

Sometimes the parent process keeps the child in the zombie state to ensure that the future children processes will not receive the same PID

$ ps aux | grep Z

Orphan Process :
---------------------

If parent process is dead but its child process is alive, the child process is declared orphan, means it is now adopted by its new parent .. the init process.

An Orphan Process is a process whose parent is dead (terminated). A process with dead parents is adopted by the init process.
When does a process become an orphan process?
Sometimes, when a process crashes, it leaves the children processes alive, transforming them into orphan processes. A user can also create a orphan process, by detaching it from the terminal.
How to find orphaned processes:
This command will not display only the orphaned processes, but all the processes having the PPID 1 (having the init process as it’s parent).
ps -elf | head -1; ps -elf | awk '{if ($5 == 1) {print $0}}'
The command snapshots all the processes with PPID 1. Keep that result. Thereafter, you may periodically run the command to compare the result of the time with snapshot taken earlier. Any differences found in the new snapshot might be potentially being orphan processes.
Note, the differences found are only suggest that they’re potential (not confirm) orphan processes in Linux system. You have to get more info to confirm them before terminating those processes. For example, how STIME figure, CPU utilization, understanding its purpose of executing, etc.
Once you have confirm them, you should not hesitate to terminate them as soon as possible, by the kill -9 command, as orphan processes will drain out your Linux system resources over the time.
>> Orphan processes use a lot of resources, so they can be easily found with top or htop. 
To kill an orphaned process, use kill -9 PID.

How to Kill a Process

How to Kill a Process
You may want to stop a process while it is running. For instance, you may be running a program that contains an endless loop, so that the process you created will never stop. Or you may decide not to complete a process you started, either because it is hogging system resources or because it is doing something unintended. If your process is actively running, just hit the BREAK or DELETE key However, you cannot terminate a background process or one attached to a different terminal this way, unless you bring it back to the foreground.
You should observe some cautions when using kill to end processes. Before you attempt to kill a process, you should ensure that you have correctly identified the process ID (PID) you wish to kill. In this “family” relationship that is built as processes spawn others, you can inadvertently kill a process that is the parent of the one you want to kill, and leave an orphan, or—in the worst case—a zombie (a process that still appears in the process table as though it were active, but either has been killed or has completed and is consuming no resources).
You may also transpose numbers in the PID and kill a process that is being used for a different purpose, even a system-level process. The results can be disastrous, especially if you use what is known as a “sure (or unconditional) kill.” This type of kill is discussed in the next section.
To terminate such a process, or kill it, use the kill command, giving the process ID as an argument. For instance, to kill the process with PID 2312 (as revealed by ps), type
$  kill  2312
This command sends a signal to the process. In particular, when used with no arguments, the kill command sends the signal 15 to the process. (Over 30 different signals can be sent on UNIX systems. See Table 11–1, in the section “Signals and Semaphores,” for a list.) Signal 15 is the software termination signal (SIGTERM) that is used to stop processes.
Table 11–1: The Thirty Most Common UNIX Signals
Signal
Abbreviation
Meaning
1)
HUP
Hangup
2)
INT
Interrupt
3)
QUIT
Quit
4)
ILL
Illegal instruction
5)
TRAP
Trace/breakpoint trap
6)
ABRT
Abort
7)
EMT
Emulation trap
8)
FPE
Floating point exception
9)
KILL
Kill
10)
BUS
Bus error
11)
SEGV
Segmentation fault
12)
SIGSYS
Bad system call
13)
PIPE
Broken pipe
14)
ALRM
Alarm clock
15)
TERM
Terminated
16)
USR1
User signal 1
17)
USR2
User signal 2
18)
CLD
Child status changed
19)
PWR
Power failure
20)
WINCH
Window size change
21)
URG
Urgent socket condition
22)
POLL
Pollable event
23)
STOP
Stopped
24)
STP
Stopped (user)
25)
CONT
Continued
26)
TTIN
Stopped terminal input
27)
TTOU
Stopped terminal output
28)
VTALRM
Virtual timer expired
29)
PROF
Profiling timer expired
30)
XCPU
CPU time exceeded
Some processes, such as the shell, do not die when they receive this signal. You can kill processes that ignore signal 15 by supplying the kill command with the 9 flag. This sends the signal 9, which is the unconditional kill signal, to the process. For instance, to kill a shell process with PID 517, type
$ kill −9 517
You may want to use kill 9 to terminate sessions. For instance, you may have forgotten to log off at work. When you log in remotely from home and use the ps command, you will see that you are logged in from two terminals. You can kill the session you have at work by using the kill 9 command.
To do this, first issue the ps command to see your running processes:
$ ps
 PID     TTY        TIME    COMD
 3211    term/41    0:05    ksh
12326    term/41    0:01    ps
12233    term/15    0:20    ksh
You can see that there are two kshs running: one attached to terminal 41, one, to terminal 15. The ps command just issued is also associated with terminal 41. Thus, the ksh associated with term/15, with process number (PID) 12233, is the login at work. To kill that login shell, use the command
$  kill  −9  12233
You can also kill all the processes that you created during your current terminal login session. A process group is a set of related processes, for example, all those with a common ancestor that is a login shell. Use the command
$  kill  0
to terminate all processes in the process group.
If you program in Shell (see Chapter 20), you may want to know if a particular process is running prior to executing a command. The 0 (zero) option of kill allows you to do this. Putting the string
kill  −0  pid
into your shell script will return a value indicating whether or not the indicated process (pid) is alive.

Parent and Child Processes

When you type a command line on your UNIX system, the shell handles its execution. If the command is a built-in command known by the shell (echo, break, exit, test, and so forth), it is executed internally without creating a new process. If the command is not a built-in, the shell treats it as an executable file. The current shell uses the system call fork and creates a child process, which executes the command. The parent process, the shell, waits until the child either completes execution or dies, and then it returns to read the next command.
Normally when the shell creates the child process, it executes a wait system call. This suspends operation of the parent shell until it receives a signal from the kernel indicating the death of a child. At that point, the parent process wakes up and looks for a new command.
When you issue a command that takes a long time to run (e.g., a troff command to format a long article), you usually need to wait until the command terminates. When the troff job finishes, a signal is sent to the parent shell, and the shell begins paying attention to your input once again. You can run multiple processes at the same time by putting jobs into the background. If you end a command line with the ampersand (&) symbol, you tell the shell to run this command in the background. The command string
$ cat * troff -mm lp 2> /dev/null &
causes all the files in the current directory to be formatted and sent to the printer. Because this command would take several minutes to run, it is placed in the background with the & symbol.
When the shell sees the & at the end of the command, it forks off a child shell to execute the command, but it does not execute the wait system call. Instead of suspending operation until the child dies, the parent shell resumes processing commands immediately If anything goes wrong with the process, the output of the lp command is redirected to the device /dev/ null(discarded) to avoid a lengthy printout of garbage.
The shell provides programming control of the commands and shell scripts you execute. The command format
$ (command; command; command) &
instructs the shell to create a child or subshell to run the sequence of commands, and to place this subshell in the background.