Wednesday, June 27, 2018

How to Clear RAM Memory Cache, Buffer and Swap Space on Linux

Clear RAM Memory Cache, Buffer and Swap Space

source

Why use huge page?

In virtual memory management, kernel maintains table in which it has mapping of virtual memory address to physical address. For every page transaction, kernel needs to load related mapping. If you have small size pages then you need to load more numbers of pages resulting kernel to load more mapping tables. This decreases performance.
Using huge pages, means you will need fewer pages. This decreases number of mapping tables to load by kernel to great extent. This increases your kernel level performance which ultimately benefits your application.
In short, by enabling huge pages, system has fewer page tables to deal with and hence less overhead to access / maintain them!

How to Clear Cache in Linux?

Every Linux System has three options to clear cache without interrupting any processes or services.
1. Clear PageCache only.
# sync; echo 1 > /proc/sys/vm/drop_caches
2. Clear dentries and inodes.
# sync; echo 2 > /proc/sys/vm/drop_caches
3. Clear PageCache, dentries and inodes.
# sync; echo 3 > /proc/sys/vm/drop_caches 
Explanation of above command.
sync will flush the file system buffer. Command Separated by “;” run sequentially. The shell wait for each command to terminate before executing the next command in the sequence. As mentioned in kernel documentation, writing to drop_cache will clean cache without killing any application/service, command echo is doing the job of writing to file.
If you have to clear the disk cache, the first command is safest in enterprise and production as “...echo 1 > ….” will clear the PageCache only. It is not recommended to use third option above “...echo 3 >” in production until you know what you are doing, as it will clear PageCachedentries and inodes.
Is it a good idea to free Buffer and Cache in Linux that might be used by Linux Kernel?
When you are applying various settings and want to check, if it is actually implemented specially on I/O-extensive benchmark, then you may need to clear buffer cache. You can drop cache as explained above without rebooting the System i.e., no downtime required.
Linux is designed in such a way that it looks into disk cache before looking onto the disk. If it finds the resource in the cache, then the request doesn’t reach the disk. If we clean the cache, the disk cache will be less useful as the OS will look for the resource on the disk.
Moreover it will also slow the system for a few seconds while the cache is cleaned and every resource required by OS is loaded again in the disk-cache.
Now we will be creating a shell script to auto clear RAM cache daily at 2am via a cron scheduler task. Create a shell script clearcache.sh and add the following lines.
#!/bin/bash
# Note, we are using "echo 3", but it is not recommended in production instead use "echo 1"
echo "echo 3 > /proc/sys/vm/drop_caches"
Set execute permission on the clearcache.sh file.
# chmod 755 clearcache.sh
Now you may call the script whenever you required to clear ram cache.
Now set a cron to clear RAM cache everyday at 2am. Open crontab for editing.
# crontab -e
Append the below line, save and exit to run it at 2am daily.
0  2  *  *  *  /path/to/clearcache.sh
For more details on how to cron a job you may like to check our article on 11 Cron Scheduling Jobs.
Is it good idea to auto clear RAM cache on production server?
No! it is not. Think of a situation when you have scheduled the script to clear ram cache everyday at 2am. Everyday at 2am the script is executed and it flushes your RAM cache. One day for whatsoever reason, may be more than expected users are online on your website and seeking resource from your server.
At the same time scheduled script run and clears everything in cache. Now all the user are fetching data from disk. It will result in server crash and corrupt the database. So clear ram-cache only when required,and known your foot steps, else you are a Cargo Cult System Administrator.

How to Clear Swap Space in Linux?

If you want to clear Swap space, you may like to run the below command.
# swapoff -a && swapon -a
Also you may add above command to a cron script above, after understanding all the associated risk.
Now we will be combining both above commands into one single command to make a proper script to clear RAM Cache and Swap Space.
# echo 3 > /proc/sys/vm/drop_caches && swapoff -a && swapon -a && printf '\n%s\n' 'Ram-cache and Swap Cleared'
OR
$ su -c "echo 3 >'/proc/sys/vm/drop_caches' && swapoff -a && swapon -a && printf '\n%s\n' 'Ram-cache and Swap Cleared'" root
After testing both above command, we will run command “free -h” before and after running the script and will check cache.
In short :

FOR RAM : # sync; echo 3 > /proc/sys/vm/drop_caches

FOR SWAP : # swapoff -a && swapon -a 


capacity of the RAID-array is calculated


The total capacity of the array is:
(n x cs) - cs = tc

n = number of drives
cs= capacity of the smallest drive
tc = total capacity

So if you have 3 drives, and they are 2x500GB and 1x750GB the total capacity will be:

(3 x 500) - 500 = 1000GB

So the optimal RAID 5 array is formed with drives of the same size.

Tuesday, December 27, 2016

tmpfs vs ramfs

tmpfs vs ramfs vs swap
Linux Magazine
using swap space


Using ramfs or tmpfs you can allocate part of the physical memory to be used as a partition. You can mount this partition and start writing and reading files like a hard disk partition. Since you’ll be reading and writing to the RAM, it will be faster.

When a vital process becomes drastically slow because of disk writes, you can choose either ramfs or tmpfs file systems for writing files to the RAM.


Both tmpfs and ramfs mount will give you the power of fast reading and writing files from and to the primary memory. When you test this on a small file, you may not see a huge difference. You’ll notice the difference only when you write large amount of data to a file with some other processing overhead such as network.

1. How to mount Tmpfs

# mkdir -p /mnt/tmp

# mount -t tmpfs -o size=20m tmpfs /mnt/tmp
The last line in the following df -k shows the above mounted /mnt/tmp tmpfs file system.
# df -k
Filesystem      1K-blocks  Used     Available Use%  Mounted on
/dev/sda2       32705400   5002488  26041576  17%   /
/dev/sda1       194442     18567    165836    11%   /boot
tmpfs           517320     0        517320    0%    /dev/shm
tmpfs           20480      0        20480     0%    /mnt/tmp

2. How to mount Ramfs

# mkdir -p /mnt/ram

# mount -t ramfs -o size=20m ramfs /mnt/ram
The last line in the following mount command shows the above mounted /mnt/ram ramfs file system.
# mount
/dev/sda2 on / type ext3 (rw)
proc on /proc type proc (rw)
sysfs on /sys type sysfs (rw)
devpts on /dev/pts type devpts (rw,gid=5,mode=620)
/dev/sda1 on /boot type ext3 (rw)
tmpfs on /dev/shm type tmpfs (rw)
none on /proc/sys/fs/binfmt_misc type binfmt_misc (rw)
sunrpc on /var/lib/nfs/rpc_pipefs type rpc_pipefs (rw)
fusectl on /sys/fs/fuse/connections type fusectl (rw)
tmpfs on /mnt/tmp type tmpfs (rw,size=20m)
ramfs on /mnt/ram type ramfs (rw,size=20m)
You can mount ramfs and tmpfs during boot time by adding an entry to the /etc/fstab.

3. Ramfs vs Tmpfs

Primarily both ramfs and tmpfs does the same thing with few minor differences.
  • Ramfs will grow dynamically.  So, you need control the process that writes the data to make sure ramfs doesn’t go above the available RAM size in the system. Let us say you have 2GB of RAM on your system and created a 1 GB ramfs and mounted as /tmp/ram. When the total size of the /tmp/ram crosses 1GB, you can still write data to it.  System will not stop you from writing data more than 1GB. However, when it goes above total RAM size of 2GB, the system may hang, as there is no place in the RAM to keep the data.
  • Tmpfs will not grow dynamically. It would not allow you to write more than the size you’ve specified while mounting the tmpfs. So, you don’t need to worry about controlling the process that writes the data to make sure tmpfs doesn’t go above the specified limit. It may give errors similar to “No space left on device”.
  • Tmpfs uses swap.
  • Ramfs does not use swap.

4. Disadvantages of Ramfs and Tmpfs

Since both ramfs and tmpfs is writing to the system RAM, it would get deleted once the system gets rebooted, or crashed. So, you should write a process to pick up the data from ramfs/tmpfs to disk in periodic intervals. You can also write a process to write down the data from ramfs/tmpfs to disk while the system is shutting down. But, this will not help you in the time of system crash.
Table: Comparison of ramfs and tmpfs
ExperimentationTmpfsRamfs
Fill maximum space and continue writingWill display errorWill continue writing
Fixed SizeYesNo
Uses SwapYesNo
Volatile StorageYesYes

If you want your process to write faster, opting for tmpfs is a better choice with precautions about the system crash.

Friday, September 16, 2016

comparison of different raid types


Features
Minimum # Drives
2
2
3
3
4
Data Protection
No Protection
Single-drive failure
Read Performance
High
High
High
High
High
Write Performance
High
Medium
Medium
Low
Low
Read Performance (degraded)
N/A
Medium
High
Low
Low
Write Performance (degraded)
N/A
High
High
Low
Low
Capacity Utilization
100%
50%
50%
67% - 94%
50% - 88%
Typical Applications
High End Workstations, data logging, real-time rendering, very transitory data
Operating System, transaction databases
Operating system, transaction databases
Data warehousing, web serving, archiving
Features
Minimum # Drives
4
4
6
8
Data Protection
Two-drive failure
Up to one disk failure in each sub-array
Up to two disk failure in each sub-array
Read Performance
High
High
High
High
Write Performance
Low
Medium
Medium
Medium
Read Performance (degraded)
Low
High
Medium
Medium
Write Performance (degraded)
Low
High
Medium
Low
Capacity Utilization
50% - 88%
50%
67% - 94%
50% - 88%
Typical Applications
Data archive, backup to disk, high availability solutions, servers with large capacity requirements
Fast databases, application servers
Large databases, file servers, application servers
Data archive, backup to disk, high availability solutions, servers with large capacity requirements


The write penalty of RAID 5
By Rickard Nobel | August 2, 2011
Compared to other RAID levels we have a higher write overhead in RAID 5. In this article we will see in some detail why there is a larger “penalty” for writing to RAID 5 disk systems.
Description: RAID 5 disks
In a RAID 5 set with any number of disks we will calculate a parity information for each stripe. See this article on how the RAID 5 parity works. In short, we use the XOR operation on all binary bits on all disks and save the result on the parity disk. For example if we have an eight disk set the actual data is saved on seven disks and parity on the last disk, see picture above.
A disadvantage with RAID 5 is how to write small IOs against the disk system. Even if the write IO will only affect the data on one disk, we still need to calculate the new parity. Since the parity, as explained in the other article, is created by using XOR on all disks this could now be done in two ways. We could either do a read against all the other disks and then XOR with the new information. This would however cause a very large overhead and it is not reasonable to block all other disks for just one write.
There is however a quite clever way to calculate the new parity with a minimum of disk IO.
Description: RAID 5 write
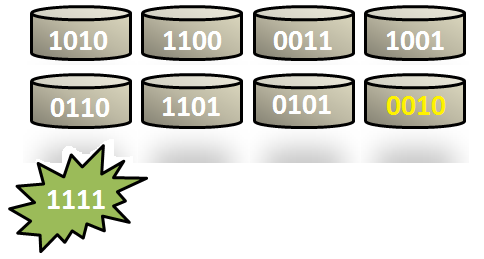
Assume we have the following eight disks and a write should be done at the fifth disk, which should be changed to, say, 1111. (For simplicity we will only look at four bits at each disk, but this could be of any size.)
To get the new parity some actions has to be done. First we read the old data on the blocks that should be changed. We can call this “Disk5-Old” and will be the first IO that must be done. The data that should be written, here 1111, can be called Disk5-New.
Disk5-0ld = 0110
Disk5-New = 1111
We will now use XOR on the old and the new data, to calculate the difference between the old and new. We can call this Disk5-Delta.
Disk5-Delta = Disk5-Old XOR Disk5-New = 0110 XOR 1111 = 1001
When we know the “delta” we will have to commit another read. This is against the old parity. We call this Parity-Old, in this example the old parity is 0010. We will now XOR the old parity with the Disk5-Delta. What is quite interesting is that this will create the new parity, but without the need to read the other six disks.
Parity-New = Parity-Old XOR Disk5-Delta = 0010 XOR 1001 = 1011
When we know the new parity we can write both the new data block and the new parity. This causes two write IOs against the disks and makes up the last of the “penalty”.
So in summary this disk actions that must be done:
1. Read the old data
2. Read the old parity
3. Write the new data
4. Write the new parity
This means that each write against a RAID 5 set causes four IOs against the disks where the first two must be completed before the last two could be performed, which introduces some additional latency.

Thursday, May 12, 2016

cpu vs core vs Socket


https://www.youtube.com/watch?v=Uqv8Y_gkkhc


##[oracle@MISGRP ~]$ lscpu

Architecture:          x86_64
CPU op-mode(s):        32-bit, 64-bit
Byte Order:            Little Endian
CPU(s):                4
On-line CPU(s) list:   0-3
Thread(s) per core:    1
Core(s) per socket:    4

Socket(s):             1  ========> Physical Socket is One

NUMA node(s):          1
Vendor ID:             GenuineIntel
CPU family:            6
Model:                 58
Stepping:              9
CPU MHz:               3200.000
BogoMIPS:              6385.79
Virtualization:        VT-x
L1d cache:             32K
L1i cache:             32K
L2 cache:              256K
L3 cache:              6144K
NUMA node0 CPU(s):     0-3
[oracle@MISGRP ~]$


# cat   /proc/cpuinfo

processor       : 8    =====================> Total Processor is 4 with multithreading

vendor_id       : GenuineIntel
cpu family      : 6
model           : 58
model name      : Intel(R) Core(TM) i5-3470 CPU @ 3.20GHz
stepping        : 9
microcode       : 0x19
cpu MHz         : 3200.000
cache size      : 6144 KB
physical id     : 0
siblings        : 4
core id         : 3

cpu cores       : 4    =======================> 4 cores under 1 Socket

apicid          : 6
initial apicid  : 6
fpu             : yes
fpu_exception   : yes
cpuid level     : 13
wp              : yes
flags           : fpu vme de pse tsc msr pae mce cx8 apic sep mtrr pge mca cmov pat pse36 clflush dts acpi mmx fxsr sse sse2 ss ht tm pbe syscall nx rdtscp lm constant_tsc arch_perfmon pebs bts rep_good nopl xtopology nonstop_tsc aperfmperf eagerfpu pni pclmulqdq dtes64 monitor ds_cpl vmx smx est tm2 ssse3 cx16 xtpr pdcm pcid sse4_1 sse4_2 x2apic popcnt tsc_deadline_timer aes xsave avx f16c rdrand lahf_lm ida arat epb xsaveopt pln pts dtherm tpr_shadow vnmi flexpriority ept vpid fsgsbase smep erms
bogomips        : 6385.79
clflush size    : 64
cache_alignment : 64
address sizes   : 36 bits physical, 48 bits virtual
power management:

----------------------------------------------------------------------------